Getting Started with Kubernetes: Running Your First Application on Kubernetes
In the previous post Introduction to Kubernetes, I have introduced Kubernetes common concepts. In this post, I will cover how to get started with Kubernetes. It includes the following content: how to set up your Kubernetes cluster and how to run your first application on Kubernetes.
Set up Kubernetes
Setting up a cluster on Google Kubernetes Engine
Installing and Initializing the gcloud CLI
Installing the gcloud CLI on macOS
brew install --cask gcloud-cli |
Initializing the gcloud CLI
gcloud init |
Setting the default region and zone
Before you create your cluster, you must decide in which geographical region and zone it should be created.
Refer to Available regions and zones to see the list of available locations.
You can also list the regions and zones by the gcloud command:
$ gcloud compute regions list |
Set the default region and zone. For example,
$ gcloud config set compute/region asia-east1 |
Create the Kubernetes cluster
# Time consumed: About 6 minutes |
List worker nodes
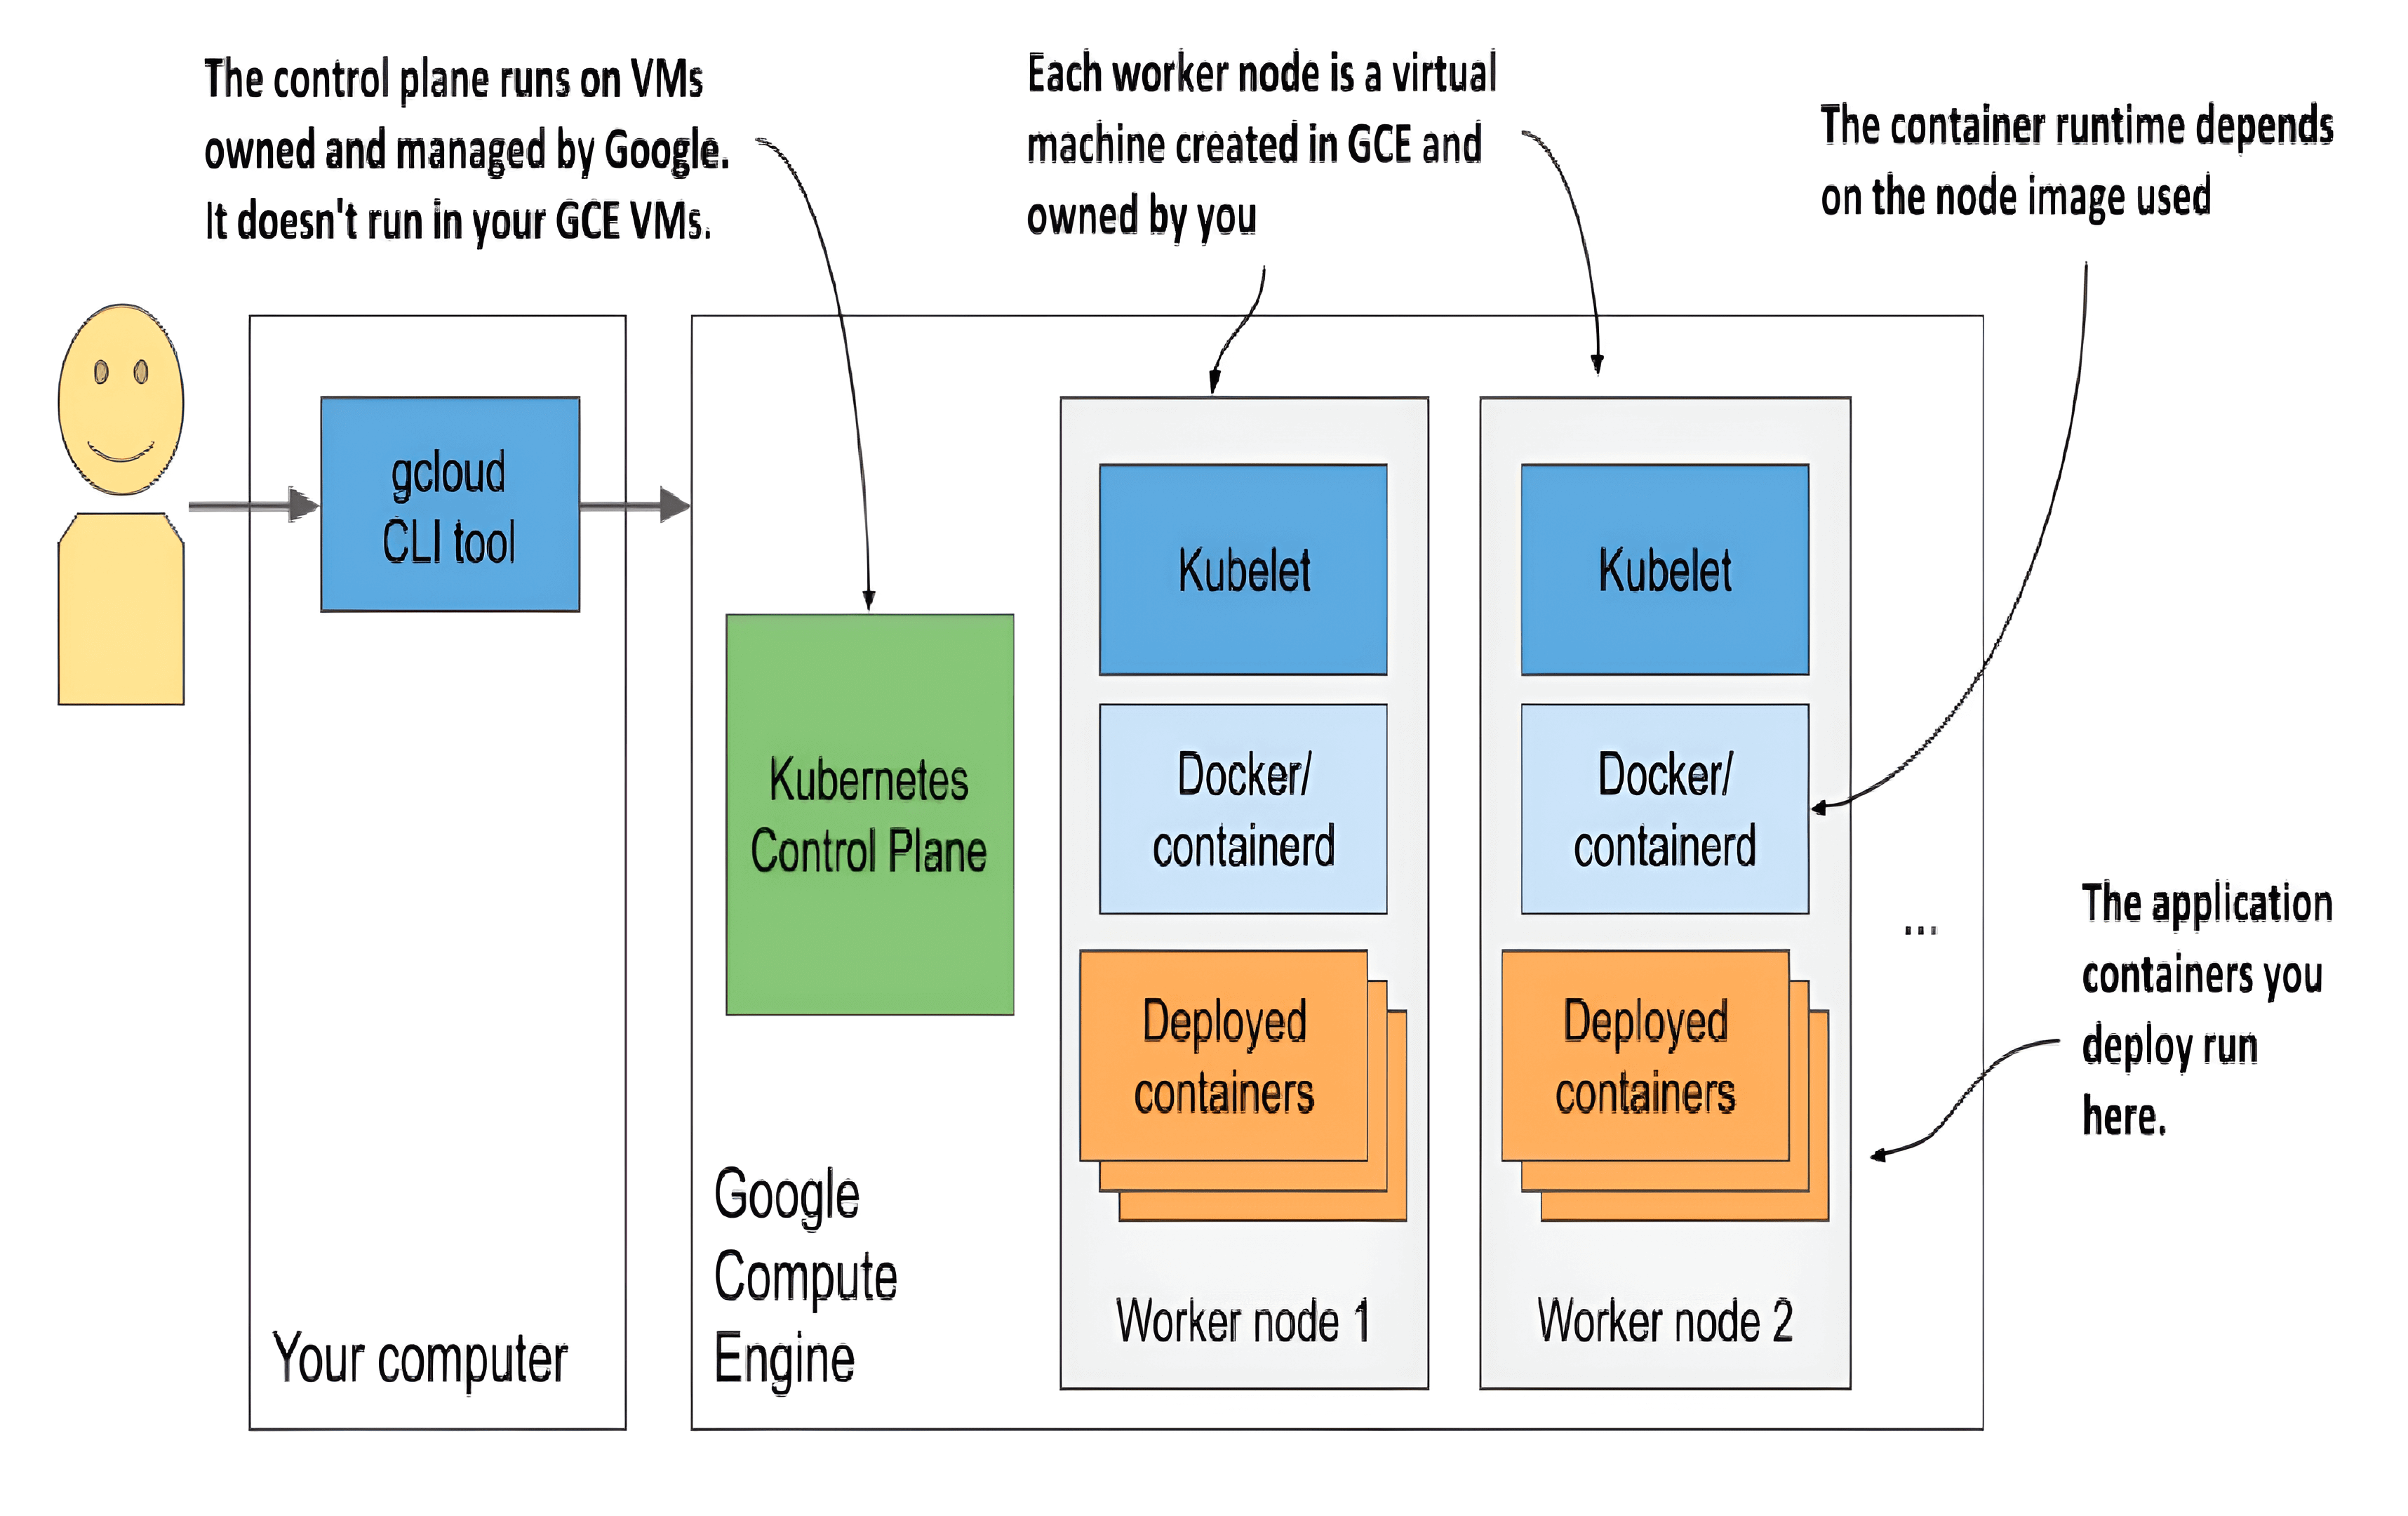
You should now have a running Kubernetes cluster with three worker nodes. Each node is a virtual machine provided by the Google Compute Engine (GCE) infrastructure-as-a-service platform. You can list GCE virtual machines using the following command:
$ gcloud compute instances list |
Each VM incurs costs. To reduce the cost of your cluster, you can reduce the number of nodes to one, or even to zero while not using it.
Note that only your worker nodes run in GCE virtual machines. The control plane runs elsewhere - you can’t access the machines hosting it.
Your Kubernetes cluster in Google Kubernetes Engine
Scaling the number of nodes
Google allows you to easily increase or decrease the number of nodes in your cluster. For most exercises in this post, you can scale it down to just one node if you want to save money. You can even scale it down to zero so that your cluster doesn’t incur any costs.
To scale the cluster to zero, use the following command:
$ gcloud container clusters resize kiada --size 0 |
Inspecting a GKE worker node
Log into a node
$ gcloud compute ssh <node_name> |
Interacting with Kubernetes
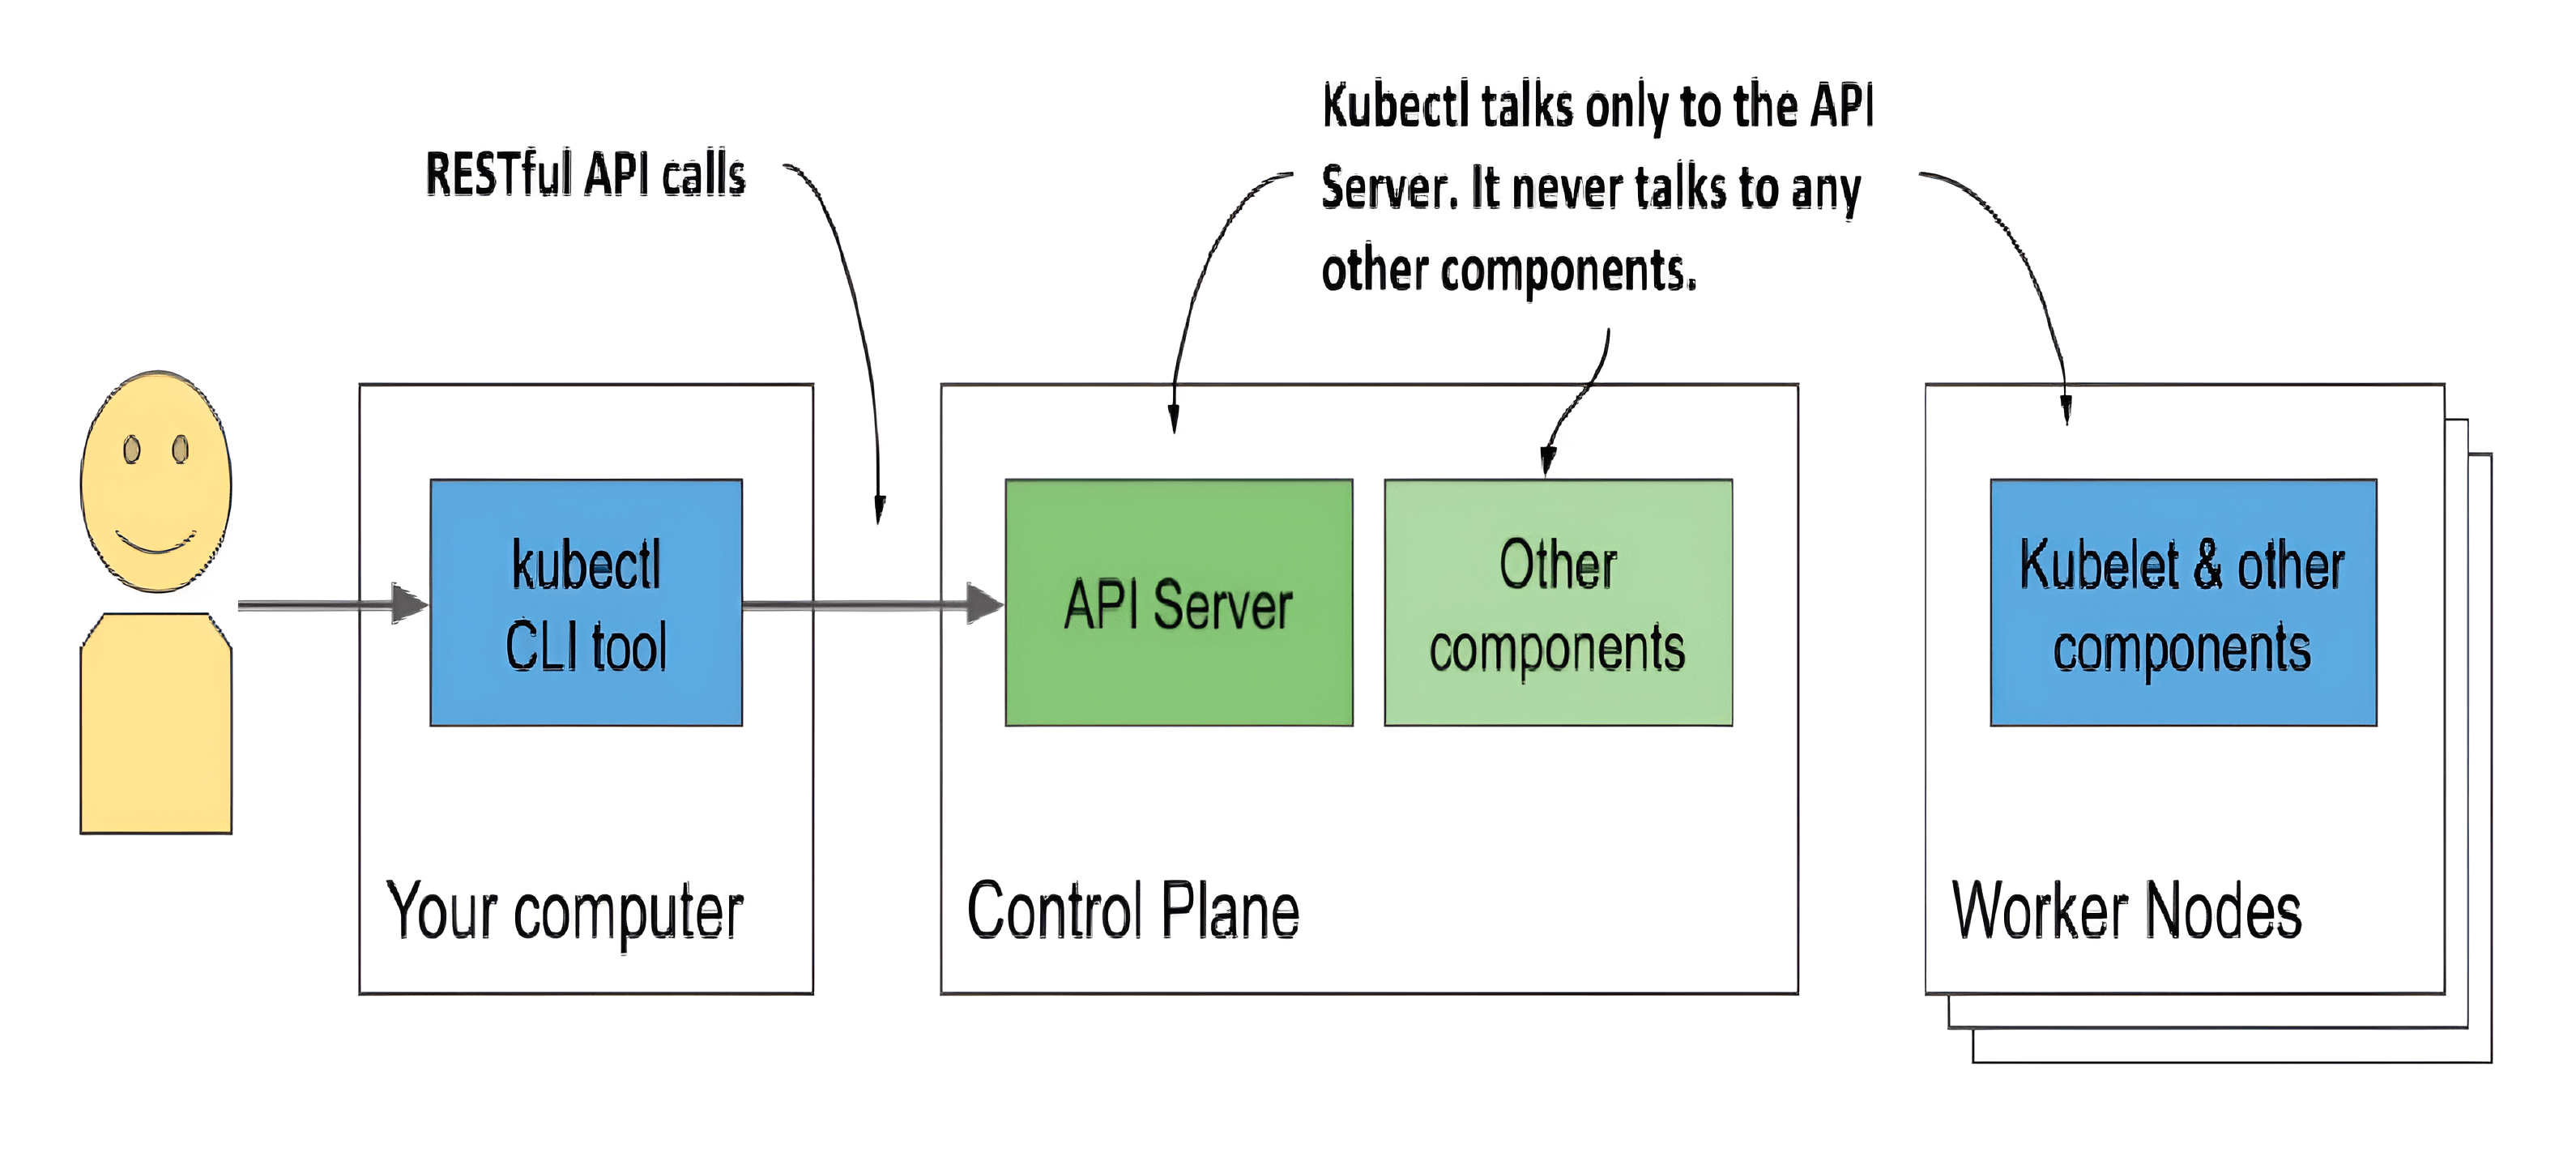
To interact with Kubernetes, you use a command-line tool called kubectl, pronounced kube-control, kube-C-T-L or kube-cuddle.
The tool communicates with the Kubernetes API server, which is part of the Kubernetes Control Plane. The control plane then triggers the other components to do whatever needs to be done based on the changes you made via the API.
How you interact with a Kubernetes cluster
Installing kubectl
Installing kubectl on macOS
$ brew install kubernetes-cli |
Setting up a short alias for kubectl
You’ll use kubectl often. Having to type the full command every time is needlessly time-consuming, but you can speed things up by setting up an alias and tab completion for it.
Most users of Kubernetes use k as the alias for kubectl. If you haven’t used aliases yet, here’s how to define it in Linux and macOS. Add the following line to your ~/.bashrc or equivalent file:
alias k=kubectl |
Note: You may not need an alias if you used gcloud to set up the cluster. It installs the k binary in addition to kubectl.
Configuring kubectl to use a specific Kubernetes cluster
The kubeconfig configuration file is located at ~/.kube/config. If you deployed your cluster using Docker Desktop, Minikube or GKE, the file was created for you.
Contexts are part of your kubectl configuration (~/.kube/config). They define which cluster, which user, and which namespace kubectl should talk to by default.
Switching contexts:
# List contexts |
Using kubectl
Verifying if the cluster is up and kubectl can talk to it
$ kubectl cluster-info |
Listing cluster nodes
To list all nodes in your cluster
$ kubectl get nodes |
Running your first application on Kubernetes
Create the web application and Docker image
1. Create a Spring Boot web application
Initializing a Spring Boot application on Spring Initializr.
- Project: Gradle - Kotlin
- Language: Java
- Project Metadata:
- Group: com.taogen
- Artifact: my-k8s-demo-project
- Java: 21
- Dependencies: Spring Web
Click the “GENERATE” button to download the source code of the project.
2. Add the web API to the project
Edit the MyK8sDemoProjectApplication.java file, and replace it with the following content.
MyK8sDemoProjectApplication.java
package com.taogen.my_k8s_demo_project; |
3. Starting the application and verifying it by visiting http://localhost:8080
4. Add the Dockerfile
Add the Dockerfile to the root directory of the project
Dockerfile
FROM eclipse-temurin:21-jre-alpine AS runtime |
5. Build the Docker image
# build the project to a JAR file |
Visiting http://localhost:8081 to verify the Docker container is up and running.
6. Publish the Docker image to DockerHub
# Creating a custom builder that uses a driver with multi-platform support |
--tag <USERNAME>/<IMAGE_NAME>:<TAG>: You can update the USERNAME to publish the Docker image to your DockerHub account.
7. Verify the published Docker image
$ docker pull tagnja/my-k8s-demo-project:0.1.0 |
Visiting http://localhost:8082 to verify the Docker container is up and running.
Running the Docker image on Kubernetes
Usually, to deploy an application, you’d prepare a JSON or YAML file describing all the components that your application consists of and apply that file to your cluster. This would be the declarative approach.
Since this may be your first time deploying an application to Kubernetes, let’s choose an easier way to do this. We’ll use simple, one-line imperative commands to deploy the application.
The imperative way to deploy an application is to use the kubectl create deployment command. It creates a Deployment object, which represents an application deployed in the cluster. By using the imperative command, you avoid the need to know the structure of Deployment objects as when you write YAML or JSON manifests.
Create a deployment
$ kubectl create deployment <deployment_object_name> --image=<image_name> |
Create a deployment using the Docker image created in the previous section
$ kubectl create deployment my-k8s-demo-project --image=tagnja/my-k8s-demo-project:0.1.0 |
The Deployment object my-k8s-demo-project is now stored in the Kubernetes API. The existence of this object tells Kubernetes that the tagnja/my-k8s-demo-project:0.1.0 container must run in your cluster. You’ve stated your desired state. Kubernetes must now ensure that the actual state reflects your wishes.
The interaction with Kubernetes consists mainly of the creation and manipulation of objects via its API. Kubernetes stores these objects and then performs operations to bring them to life. For example, when you create a Deployment object, Kubernetes runs an application. Kubernetes then keeps you informed about the current state of the application by writing the status to the same Deployment object. You can view the status by reading back the object.
Listing deployments
$ kubectl get deployments |
NAME READY UP-TO-DATE AVAILABLE AGE |
Introducing Pods
In Kubernetes, instead of deploying individual containers, you deploy groups of co-located containers – so-called pods.
A pod is a group of one or more closely related containers that run together on the same worker node and need to share certain Linux namespaces, so that they can interact more closely than with other pods.
The relationship between containers, pods, and worker nodes
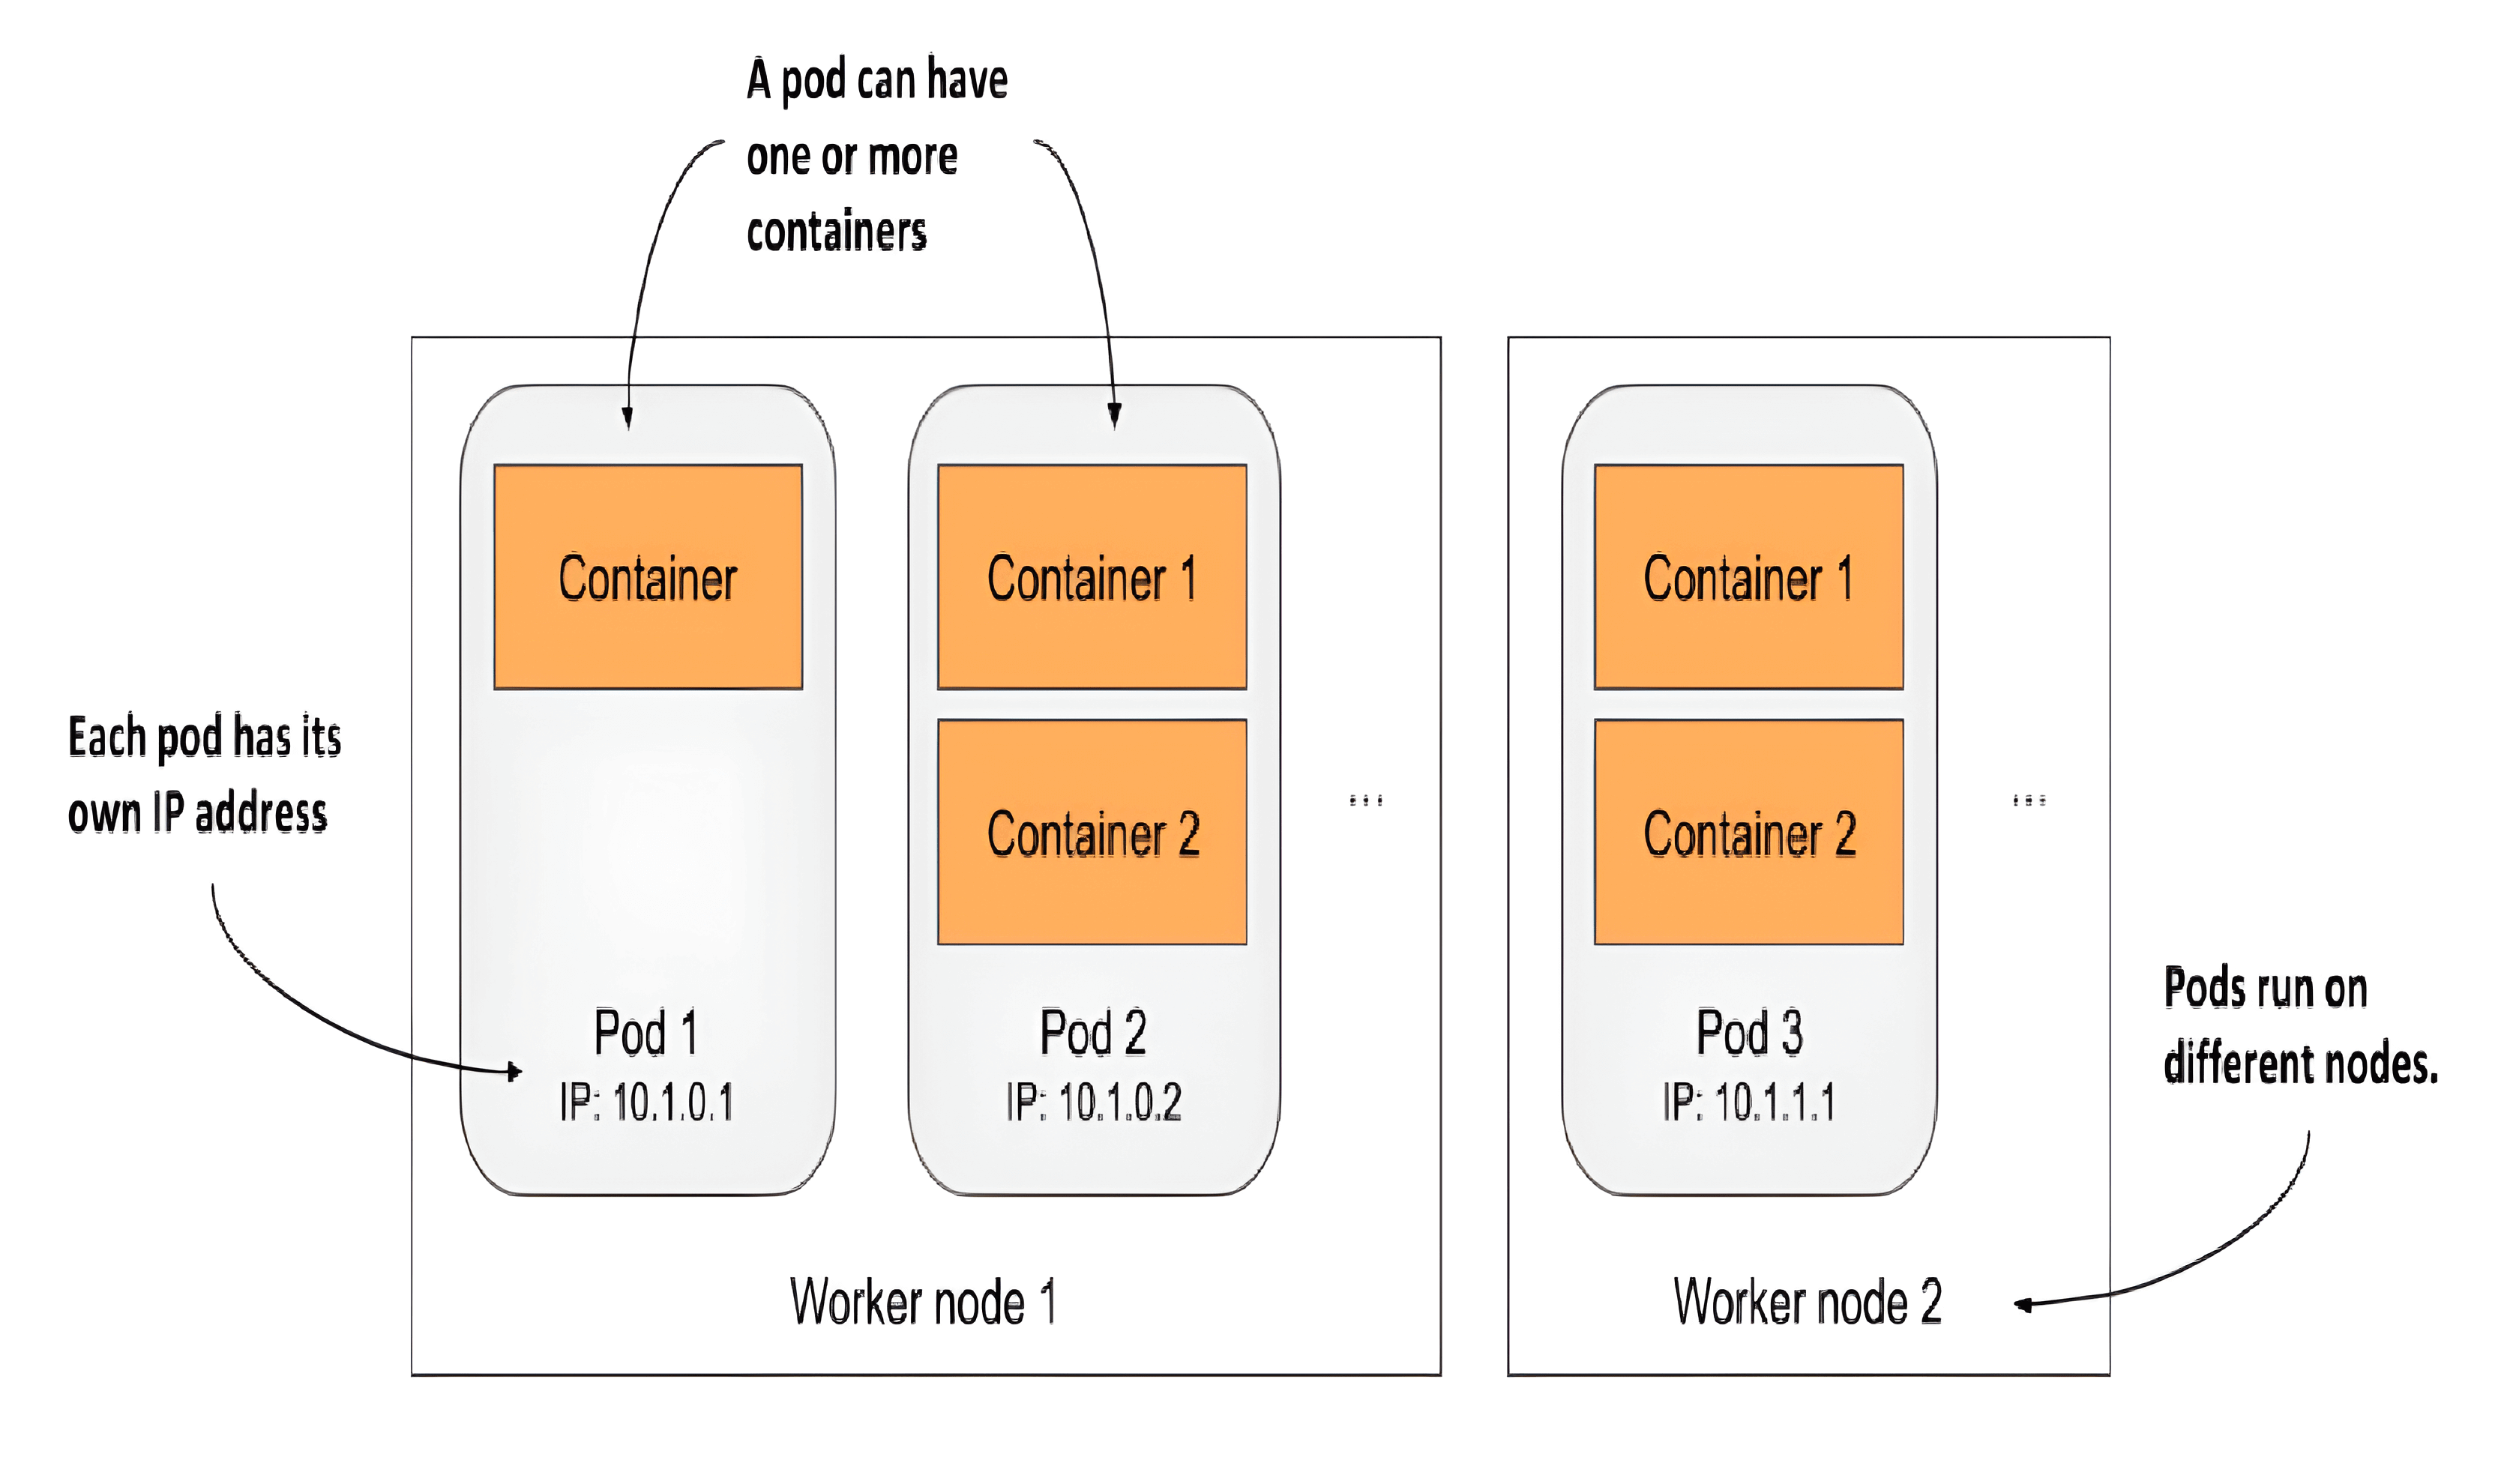
You can think of each pod as a separate logical computer. One pod may contain one or more containers. Each pod has its own IP, hostname, processes, network interfaces and other resources.
Listing pods
Since containers aren’t a top-level Kubernetes object, you can’t list them. But you can list pods.
$ kubectl get pods |
NAME READY STATUS RESTARTS AGE |
This is the pod that houses the container running your application. If you simply want to see more information about the pod, you can also use the kubectl describe pod command
$ kubectl describe pods my-k8s-demo-project-b9d6fd45c-2zshw |
Look at the events shown at the bottom of its output to see what happened in this pod.
... |
Understanding what happens behind the scenes
When you ran the kubectl create command, it created a new Deployment object in the cluster by sending an HTTP request to the Kubernetes API server. Kubernetes then created a new Pod object, which was then assigned or scheduled to one of the worker nodes. The Kubernetes agent on the worker node (the Kubelet) became aware of the newly created Pod object, saw that it was scheduled to its node, and instructed Docker to pull the specified image from the registry, create a container from the image, and execute it.
Accessing Your Pod
port-forward
Forward network traffic from the local machine to the Pod
$ kubectl port-forward <pod-name> <local_port>:<container_port> |
Visiting http://localhost:8080 to access the application running in Kubernetes.
logs
Get the logs of the pod
$ kubectl logs <pod_name> |
attach
Attach to the running process
$ kubectl attach -it <pod_name> |
The attach command is similar to kubectl logs but will allow you to send input to the running process.
exec
Running Commands in Your Container with exec
$ kubectl exec <pod_name> -- <command> |
cp
Copying Files to and from Containers
# copy files from container |
top
See the resources (e.g., total number of cores, memory size) in use by nodes
$ kubectl top nodes |
See the resources (e.g., total number of cores, memory size) in use by pods
# all pods' CPU and memory usage |
Exposing your application to the world
The application is now running, but it is not accessible from the outside. Each pod gets its own IP address, but this address is internal to the cluster and not accessible from the outside. To make the pod accessible externally, you’ll expose it by creating a Service object.
Several types of Service objects exist. You decide what type you need. Some expose pods only within the cluster, while others expose them externally. A service with the type LoadBalancer provisions an external load balancer, which makes the service accessible via a public IP.
Creating a Service
The easiest way to create the service is to use the following imperative command:
$ kubectl expose deployment <deployment_name> --type=LoadBalancer --port=<expose_port> --target-port=<container_port> |
Listing services
$ kubectl get services |
NAME TYPE CLUSTER-IP EXTERNAL-IP PORT(S) AGE |
Visiting the application with the external IP http://34.168.115.36:8080
Understanding load balancer services
While Kubernetes allows you to create so-called LoadBalancer services, it doesn’t provide the load balancer itself. If your cluster is deployed in the cloud, Kubernetes can ask the cloud infrastructure to provision a loadbalancer and configure it to forward traffic into your cluster. The infrastructure tells Kubernetes the IP address of the load balancer and this becomes the external address of your service.
Horizontally scaling the application
You now have a running application that is represented by a Deployment and exposed to the world by a Service object. Now you can scale your application.
You’re currently running a single instance of your application. Imagine you suddenly see many more users using your application. The single instance can no longer handle the load. You need to run additional instances to distribute the load and provide service to your users. This is known as scaling out. With Kubernetes, it’s trivial to do.
Increasing the number of running application instances
To deploy your application, you’ve created a Deployment object. By default, it runs a single instance of your application. To run additional instances, you only need to scale the Deployment object with the following command:
$ kubectl scale deployment <deployment_name> --replicas=<num> |
You’ve now told Kubernetes that you want to run three exact copies or replicas of your pod. Note that you haven’t instructed Kubernetes what to do. You haven’t told it to add two more pods. You just set the new desired number of replicas and let Kubernetes determine what action it must take to reach the new desired state.
This is one of the most fundamental principles in Kubernetes. Instead of telling Kubernetes what to do, you simply set a new desired state of the system and let Kubernetes achieve it. To do this, it examines the current state, compares it with the desired state, identifies the differences and determines what it must do to reconcile them.
Seeing the results of the scale-out
View the Deployment object to see how the scale command has affected it
$ kubectl get deployments |
NAME READY UP-TO-DATE AVAILABLE AGE |
listing pods
$ kubectl get pods |
NAME READY STATUS RESTARTS AGE |
Observing requests hitting all three pods when using the service
Now that multiple instances of your app are running, let’s see what happens when you access the service URL multiple times.
$ curl http://34.168.115.36:8080 |
You can see that now you are using a load-balancer to request all pods.
Summary
Understanding the API objects representing your application
The Deployment object represents an application deployment. It specifies which container image contains your application and how many replicas of the application Kubernetes should run. Each replica is represented by a Pod object. The Service object represents a single communication entry point to these replicas.
Understanding the pods
The essential and most important part of your system is the pods. Each pod definition contains one or more containers that make up the pod. When Kubernetes brings a pod to life, it runs all the containers specified in its definition. As long as a Pod object exists, Kubernetes will do its best to ensure that its containers keep running. It only shuts them down when the Pod object is deleted.
Understanding the role of the Deployment
When you first created the Deployment object, only a single Pod object was created. But when you increased the desired number of replicas on the Deployment, Kubernetes created additional replicas. Kubernetes ensures that the actual number of pods always matches the desired number.
If one or more pods disappear or their status is unknown, Kubernetes replaces them to bring the actual number of pods back to the desired number of replicas. A pod disappears when someone or something deletes it, whereas a pod’s status is unknown when the node it is running on no longer reports its status due to a network or node failure.
Strictly speaking, a Deployment results in nothing more than the creation of a certain number of Pod objects. You may wonder if you can create Pods directly instead of having the Deployment create them for you. You can certainly do this, but if you wanted to run multiple replicas, you’d have to manually create each pod individually and make sure you give each one a unique name. You’d then also have to keep a constant eye on your pods to replace them if they suddenly disappear or the node on which they run fails. And that’s exactly why you almost never create pods directly but use a Deployment instead.
Understanding why you need a service
The third component of your system is the Service object. By creating it, you tell Kubernetes that you need a single communication entry point to your pods. The service gives you a single IP address to talk to your pods, regardless of how many replicas are currently deployed. If the service is backed by multiple pods, it acts as a load balancer. But even if there is only one pod, you still want to expose it through a service.
Pods are ephemeral. A pod may disappear at any time. This can happen when its host node fails, when someone inadvertently deletes the pod, or when the pod is evicted from an otherwise healthy node to make room for other, more important pods. As explained in the previous section, when pods are created through a Deployment, a missing pod is immediately replaced with a new one. This new pod is not the same as the one it replaces. It’s a completely new pod, with a new IP address.
If you weren’t using a service and had configured your clients to connect directly to the IP of the original pod, you would now need to reconfigure all these clients to connect to the IP of the new pod. This is not necessary when using a service. Unlike pods, services aren’t ephemeral. When you create a service, it is assigned a static IP address that never changes during lifetime of the service.
Instead of connecting directly to the pod, clients should connect to the IP of the service. This ensures that their connections are always routed to a healthy pod, even if the set of pods behind the service is constantly changing. It also ensures that the load is distributed evenly across all pods should you decide to scale the deployment horizontally.
More articles about Kubernetes
- Introduction to Kubernetes
- Getting Started with Kubernetes: Running Your First Application on Kubernetes
- Common Uses of Kubernetes
References
[1] Kubernetes in Action, 2nd Edition